Icon Creeeator
Examples
A few examples of what IconCreeeator turns normal icons into:

Icon Creeeator is a nice little tool which allows you to easily create beautiful icons for the Easy Mode of Asus' Eee PC. Icon Creeeator allows you to create icons that fit perfectly to the other icons of the Easy Mode, complete with perspective and shadow and everything.
License

Icon Creeeator
is licensed under a Creative Commons license.
When redistributing this work, a link to this page has to be added.
Download
Here you can download the current version 0.9.2 (English) of Icon Creeeator:
 Download (JAR File, 157 KB)
Installation
You don't need to install Icon Creeeator. Just save the JAR file you've just downloaded to any folder on your Eee PC (or any other computer).
If you don't want to install Icon Creeeator on your Eee PC with stock Xandros Linux but on any computer with any operating system (other Linux distribution, Windows, Mac OS X - everything should work), you perhaps need to install Java Runtime Version 5 or higher first. You can get it from Sun or if you use Linux from the repositories of almost any distribution (install it using the corresponding package manager, package name is java5-sun or similar)
Launching Icon Creeeator
To launch the application, open a Terminal (Ctrl+Alt+T in Easy Mode), use cd Folder to get to the folder to which you saved the JAR File (e.g. cd /home/user/Desktop) and then enter:
sudo java -jar icreeeator.jar
sudo ist required so Icon Creeeator can save the icons directly to the AsusLauncher directory. If you just want to test the program or don't trust me (or don't trust any Germans at all), you can of course start it without sudo.
You can also use Icon Creeeator on any other computer running Linux, Windows or Mac OS X (the latter not tested yet) if you have installed Java Runtime 5 or higher (can be downloaded here for free). How you then start the application depends on your operating system.
Using Icon Creeeator
You should be able to use Icon Creeeator very intuitively.
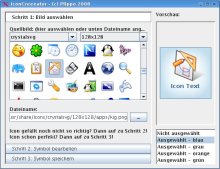
In Step 1 you choose the source image from which you want to create your icon. You can either choose an icon from the list (only if you run Linux) or click the button with the thre dots beside the “file name” field to manually choose a PNG file.
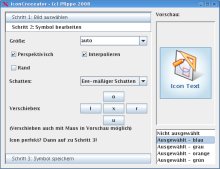
Afterwards please click the button Step 2 to edit the icon and make it fit your wishes. Just play with the different options until the result is perfect.
You can also move the icon by dragging the preview with your mouse, but unfortunately that's very slow.
Using the list to the right you can choose in which state you want to see the preview of the icon, but please note that it will always be saved in all colors, not only the one you choose here.
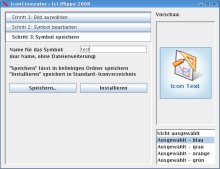
Now it's time for Step 3. Here you need to enter a name for the icon (e.g. firefox or settings). If you now click Save... you can choose a folder where you want to save the icon (which consists of six files for the different colors). If you click Install, it is saved to the folder /opt/xandros/share/AsusLauncher and can be directly used by an application like Launcher Tools or Easy Mode Editor (or manually added to the file simpleui.rc).
Hints
- Icon Creeeator works best with flat icons. You can also use it for other icons without problems if you switch off perspective and perhaps also shadow (But then they don't look that “Eee-like” any more). Just play with the options in step 2 and you should get a good result for almost any input image.
- Users of the windows application Easy Mode XP oder of a non-european (and british) Eee PC that have not recently updated their system should choose an icon size of 120x120, everyone else 130x130.
- Good PNG images for many application that you can use with Icon Creeeator can be found on the page for that application in the English Wikipedia. If you once click on the icon you see there, you see a larger preview. Right click on that preview and save the PNG file (don't use a link to an SVG file - those don't work with Icon Creeeator).
- Many great icons you can find here (multiple pages - click “next 200”).


